Quick questions

     Clearing the Cache and Cookies in a browser helps to fix issues, which cause errors on a webpage if portal has got any changes of design or functionality. If cache is not cleared, browser will use old data instead of new, what can cause errors. Clearing the Cache and Cookies can fix these errors.

Sometimes it is necessary to clear the Cache more than once.

Google Chrome 69.0

1. Select the Tools icon ,

2. Select More toolsand Clear browsing data,

3. Select Advanced, time range All time and select checkboxes:

  • Cookies and other site data;

  • Cached images and files,

4. Click Clear data,

5. Close and restart your browser.


Mozilla Firefox 62.0

1. Select Open Menu / Options page:

2. Select Privacy and Security, History

3. Click Clear History, chose:

  • choose Cache
  • choose Cookies

4. Click Clear,

5. Close and restart your browser.


Internet Explorer 11

1. Select Tools  and choose Internet Options,


2. Under "Browsing history," click Delete,


3. Select the following checkboxes:

  • Temporary Internet files and web site files;

  • Cookies and web site data,

4. Click Delete,

5. Click OK,

6. Close and restart your browser.


Microsoft Edge 41.1

1. Select Settings and more  and choose Settings,

2. Select Choose what to clear,

3. Select the following checkboxes:

  • Cookies and saved website data;

  • Cached data and files,

4. Click Clear,

5. Close and restart your browser.


Opera 55.0

1. Select   and choose Clear browsing dataunder History,

2. In "Obliterate the following items from" select the beginning of time;

3. Select the following checkboxes:

  • Cookies and other site data;

  • Cached images and files,

4. Click Clear browsing data,

5. Close and restart your browser.


If You are using another browser or different version, here You can find usefull information about clearing the Cache.


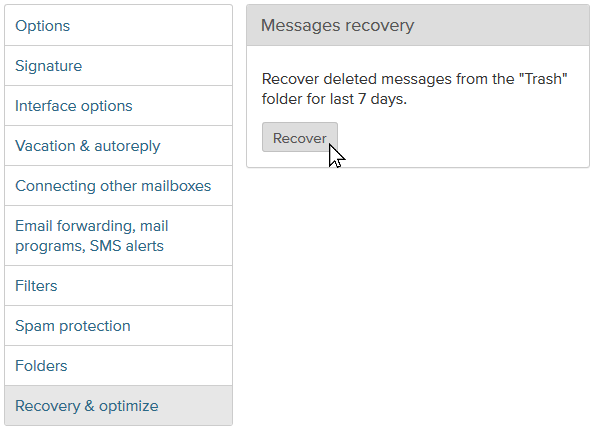
This option allows recovering deleted messages from the Trash folder for last 7 days. Attention! After pressing Recover button please wait about 15 minutes before all deleted messages will be recovered and placed back into Trash folder.


To recover deleted messages from folder Trash:

  1. Login into your account;
  2. Open section Options;
  3. From the menu on the left choose Recovery & optimize;
  4. To complete action, press Recover.


     fb9bb69b72caf552ea21a088c7d397-1683542104-base.png


When You receive a new message, You have an opportunity to apply any filter to sender straight in the message reading view. To do that:

  1. open the message;
  2. click on the name of sender;
  3. in the drop-down menu choowse option "Create a filter".

After this You'll get redirected to the "Options"  section, where You are able to finish adding any filter to the certain sender.
More about filters - here.


Tags: spam  

If you have deleted messages from the folder, go to "Trash" and use the search form who is located on the top corner to find the necessary deleted posts. If the letter was found, restore it to folder "Incoming”.


If you delete messages from the folder "Trash” (or repeatedly press to clean the trash)  deleted messages of the last seven days can be restored back.


If you clear the entire contents of a folder for example the Spam folder or any other in this case, letters are deleted immediately without trading in Trash. These letters can’t be restored.


If you receive any letter, which accords to the spam rules, please inform us about this letter to add it to the SPAM filter of the portal and avoid it's further sending to users.


To do that:

  1. Enter your mailbox;
  2. Open a letter;
  3. Click on Spam.

2e849ef4be99f57a7daae46907541a-1683542670-base.png


In this case, letter goes to the queue of SPAM filter of the portal and if it is a spam, we will prevent it's further mailing to you and otherusers.
Thank you for the colaboration.

! After clicking on the Spam  button, this email will automatically be moved to the Trash, and in the Filters section a rule will be created that will place all further such emails immediately in the Spam. If necessary, you can change the rules to something else, for example, immediately remove this letter from the mail. Read more about filters here


An alias (the meaning of the word: a fictitious name, also known as a pseudonym) is a synonym or an additional name for your existing email account.

The alias is useful when you do not want to specify your real email address.

For example: when registering on a website to order a delivery or to place an ad, you do not want your personal email address, janis.berzins@inbox.lt, to be publicly available. In this case, you can use an alias for your main email address, for example: j.reklama@inbox.lt.

All emails sent to j.reklama@inbox.lt will be sent to your main mailbox janis.berzins@inbox.lt; however, the sender will not learn your main email address.

(!) The alias can be active for an unlimited period of time or until the removal of your main email account inbox to which it was connected. For aliases can use filters.

When there is no more need for an additional email address (an alias), you can delete it, and you will never receive emails sent to this email address again. 

You cannot use an alias to log in to your main email account. Only use your username and password.

You can write also new message and send Reply from the created alias.

The maximum number of aliases for one mailbox = 5.

Aliases are also useful for the following:

  • for long email addresses or email addresses that are difficult to remember. For example: for janis.berzins@inbox.lt, you can create an easier alias that is more convenient to use, like jb@inbox.lt;
  • for better spam protection of your main mailbox. In the case if a lot of spam is sent to the email address of the created alias, a new alias with a different name is simply created, and the old one is deleted;
  • for users of the www.inbox.eu domain mail, it is convenient to use aliases to create additional email addresses for incoming email messages, such as webmaster@yourdomain.com, info@yourdomain.com, support@yourdomain.com, ads@yourdomain.com, etc... All emails from these email addresses will be collected and administered in one mailbox, which is your main email account.

How to create an alias:

  1. go to mailbox settings;
  2. open the Forwards & aliases section;
  3. select the Email Aliases sub-section, click on the Add button;
  4. enter your alternate email address (without any domain name) and save it.

Your alias will be active immediately after its creation.

29002bcdbca3141666fd312149077a-1683541646-base.png

78a100eb7acb892d1fb6c2b7d56606-1683541646-base.png

How to remove an alias:

  1. go to mailbox settings;
  2. open the Forwards & aliases section;
  3. select the Email Aliases sub-section;
  4. click on the Delete button in the list near the alias you need.

After clicking on the Delete button - alias continue to work, untill it will be completely removed from the system automatically after 30 days.

If you have changed your mind about deleting this alias, you can click Restore, and this alias will be active again, in the same way as it was before.

aca4a32c207ebee132647e1c1a1e17-1683541647-base.png